Tooling
“automation-cli” is equipped with several commands to facilitate the development of operations. For more details on how to use a command, run : OPS="$(pwd)" automation-cli [command name] --help
Manifest and script editing functions
For file editing functions, the editor used is the one defined by default in your environment. If you wish to specify a particular editor, for example “nano”, first run the command : export EDITOR="nano" or prefix the “automation-cli” command with EDITOR="nano" automation-cli .... By default, “automation-cli” uses “vi”.
|setupops| - Initializing an operations repository (OPSDirectory)
This command creates a repository for all your operations. more details in this chapter
automation-cli setupops "[OPSDirectory name]"|cop| - Create an “operation” from the template
An operation is stored in a directory at the root of the “[OPSDirectory]/operations/” directory. The operation name supports “namespace” notation, to enable the process lifecycle to be broken down: Create, Read, Update, Delete (CRUD).
Command: OPS="$(pwd)" automation-cli cop "[namespace]/[operation Name]" -c "comment for this operation"
For example, you want to manage the DNS service (namespace “dns”):
- Create service.
- Read configuration.
- Modify configuration.
- Delete service.
/OPSDirectory├── Infra server│ ├──operationBooks│ │ └──setup.yaml│ └──operations│ └── dns│ ├── create│ │ ├── ./run.sh│ │ └── ./manifest.yaml│ ├── read│ │ ├── ./run.sh│ │ └── ./manifest.yaml│ ├── update│ │ ├── ./run.sh│ │ └── ./manifest.yaml│ ├── delete│ │ ├── ./run.sh│ │ └── ./manifest.yamlThe commands for creating these operations (“namespace” notation) are :
OPS="$(pwd)" automation-cli cop "dns/create" -c "Create Dns service"OPS="$(pwd)" automation-cli cop "dns/read" -c "Read Dns service configuration file"OPS="$(pwd)" automation-cli cop "dns/update" -c "Update Dns service configuration file"OPS="$(pwd)" automation-cli cop "dns/delete" -c "Delete Dns service"|cob| - Create an “operationBook” from the template
An “operationBook” is a file in “YAML” format. The purpose of this command is to create this file in the “operationBooks” directory of the “OPSDirectory”.
Command: OPS="$(pwd)" automation-cli cob "[operationBook Name]"
Example :
OPS="$(pwd)" automation-cli cob "setup" # the .yaml extension is set automatically/OPSDirectory├── Infra server│ ├──operationBooks│ │ └──setup.yaml│ └──operations│ └── [...]|obaddop| - Adding an operation to an OperationBook
Handling the yaml format can be tedious on a day-to-day basis. This command inserts an “operation” into an operationBook, specifying the name of the operation and the name of the operationBook (no need to add the yaml extension).
The ‘operationBook’ file specified as a parameter is automatically created if it does not already exist.
OPS="$(pwd)" automation-cli obaddop -op "[namespace]/[operation name]" -ob "[operationBook name]"|edit| - Edit operation/operationBook
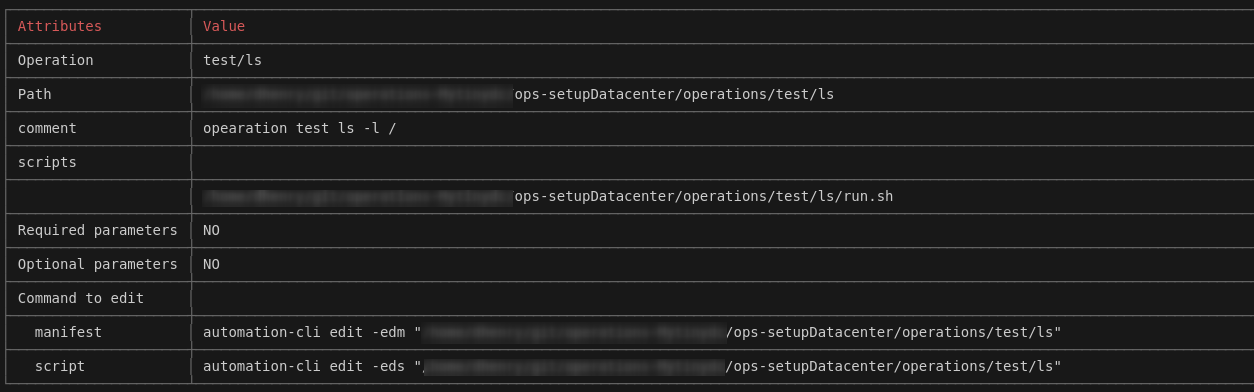
“automation-cli” features the ‘edit’ command, with the following options:
-edm” for manifest editing
-eds” for script editing. If the operation specifies several scripts, the program will present the list of scripts :

Concerning the choice of editor see this chapter
operation : with “edit”
- Manifest edition
OPS="$(pwd)" automation-cli edit -op "operation name" -edm- Edit script
OPS="$(pwd)" automation-cli edit -op "operation name" -edsoperationBook : with “edit”
“operationBook” is a manifest, so it is not necessary to specify the type of file to be edited.
- Manifest editing :
OPS="$(pwd)" automation-cli edit -ob "operationBook name"Although “-edm” is more appropriate in this situation, for convenience I’ve left the two possibilities -edm or -eds.
With “run”
For practical reasons, it’s also possible to edit files using the “run” command.
For example, if you’re building the “test” operation with multiple parameters, to avoid “juggling” between the “edit” and “run” commands, stick with the “run” command, then add the function parameter of the file to be edited:
Example with this run command :
OPS="$(pwd)" automation-cli run -op "test" -e MYVAR1="test1" -e MYVAR2="test2"Execution goes wrong.
Retrieve the command, and add “-eds ‘ to edit the script or ’-edm ” to edit the manifest:
OPS="$(pwd)" automation-cli run -op "test" -e MYVAR1="test1" -e MYVAR2="test2" -edsOPS="$(pwd)" automation-cli run -op "test" -e MYVAR1="test1" -e MYVAR2="test2" -edmYou can also edit the “operationBook ” by following the same procedure :
OPS="$(pwd)" automation-cli run -ob "operationBooktest" -e MYVAR1="test1" -e MYVAR2="test2" -edmAlthough “-edm” is the most suitable in this situation, for convenience I’ve left the two possibilities “-edm” or “-eds”.
|run| - Perform an operation
The command for executing an operation is “run”, followed by “sub-commands” and/or execution options (switches). To find out which parameters are required, run : automation-cli ou automation-cli run --help.
By default, the operations directory (OPSDirectory) is “/var/lib/automation-cli”.
To specify a different directory, use the “OPS” environment variable, assigning the value of a directory relatively or absolutely (preferred). You can use the “pwd” or “realpath” commands to help you define this directory.
This variable must be declared before running “automation-cli”. Either :
- by exporting this variable globally :
export OPS="/home/user/devops" - or by prefixing the “automation-cli” command with the OPS variable :
OPS="/home/user/devops" automation-cli run ....
The current console path is already in the “OPSDirectory”. :
OPS="$(pwd)" automation-cli run ...` ou `OPS="$(realpath .)" automation-cli run ...This chapter details the complete execution sequence.
Switch -h
This parameter is mandatory.
The value is the host name(s) or host IP address(es). Define this list by separating each target with a space (“server1 server2 server3 192.168.1.1 …”). A list must be enclosed in quotation marks or apostrophes.
Switch -op | -ob | -c
One of these switches is mandatory.
WARNING: The name of the “operation” specified in the “-op” parameter is relative to the OPS path (OPSDirectory).
WARNING: The name of the “operationBook” mentioned in the “-ob” parameter is relative to the OPS path (OPSDirectory).
Switch -y
This parameter is optional.
Running a PLC on a server can lead to serious malfunctions. This is why “automation-cli” will always ask you to confirm the execution of an operation. However, if you know what you’re doing and wish to override this confirmation request, add the “-y” option. : automation-cli run [...] -y
Switch -sshpk
This parameter is optional.
In a key authentication process, the control node must have a private key, and the managed node(s) must have the public key corresponding to this private key (user /root/.ssh/authorized_keys). This allows you to connect to remote hosts without having to provide a password. For more information on SSH authentication, please refer to the SSH documentation.
By default, automation-cli uses your private key, located in your home directory (`ls ~/.ssh).
In a distributed context, access keys are referenced and stored in a secure environment. Depending on individual rights, the administrator distributes the necessary keys. These keys are stored on your workstation and must be protected.
To use them with automation-cli, add the parameter ‘-sshpk’ followed by the exact location of this key: automation-cli -sshpk "[private key path]".
If you specify an inventory file (“-i”), you can add the path of the SSH private key to the “sshpk” attribute. In this case, don’t use the ‘-sshpk’ parameter, as “automation-cli” will always try to retrieve this value from the specified inventory.
Example of inventory file :
sshpk: /mypath/sysadminKeyYou can specify a relative path, in which case the working base will be the path defined by the “OPS” environment variable (OPSDirectory). This allows SSH keys to be embedded in the operations repository.
WARNING: If your operation repository includes SSH keys and is integrated into a Git repository, the private keys will need to be password-protected.
Switch -sshpass
This parameter is optional.
Some SSH private keys may be password-protected. To pass this value to SSH, use the -sshpass “supersecret” parameter. If you specify an inventory file (“-i”), you can add this password to the “sshpass” attribute. In this case, don’t use the ‘-sshpass’ parameter, as “automation-cli” will attempt to retrieve this secret from the specified inventory.
Example of inventory file :
sshpk: /mypath/sysadminKeysshpass: "mysecret"Passing secrets on the command line is bad practice, because the secret is stored in the history of commands executed (history). More on secrets
Switch -edm
This parameter is optional, works for both types of manifest (operation and operationBook).
Enables you to edit the operation manifest in the active console,
Concerning the choice of editor see this chapter
Switch -eds
This parameter is optional.
Enables script editing in the active console. If the operation specifies several scripts, indicate the name behind “-eds” (e.g. -eds “run1.sh”).
By default, the editor opens the first script in the “scripts” attribute.
Concerning the choice of editor see this chapter
Switch -lh (-json)
Allows you to list the hosts on which operations will be performed, and exit immediately. You can add the “-json” option to obtain a result in the form of a JSON object.
Example:
automation-cli run -c "ls -l" -h "localhost" -lh
Example with output in JSON format:
automation-cli run -c "ls -l" -h "localhost" -lh -json[ { "userInput": "localhost", "resolvedAs": "127.0.0.1" }]Switch -s (silent)
The operation will be run in silent mode: no standard output or post-execution report, only errors will be displayed.
Use this switch when executing by scheduled task (cron).
When a task is executed by “cron”, output is automatically redirected to the e-mail address of the account running the tếche. This avoids sending unnecessary e-mails.
Switch -q (quiet)
The operation will be executed in silent mode: no error output or post-execution report, only standard output is displayed, except for operations using “register” mode.
Use this switch to retrieve a value. For example, if you execute an operation that returns an identifier, you can retrieve this value in a variable, which could be used by the next command (in this case, a simple “echo”).:
variable=$(automation run -op "myoperation" -h "localhost" -q -y)echo "${variable}Switch -e
This switch is responsible for providing values for the operations environment. The syntax is: -e NOMVARIABLE=“VALUE”. You can specify more than one switch. The values supplied here take precedence over any values supplied by “operation” and “operationBook”. It can also be used to enrich the preparation environment. It can be used in the interpolation that can be found in an inventory or the “when” parameter in “operationBook”. Note that values passed via this switch cannot override your current work environment. For example, if your environment specifies the “USER” variable, passing a new value via this switch will not be taken into account. In this case, you know what you’re doing: this variable must prefix the “automation-cli” command. : USER="other" automation-cli run ....
For more information on the environment consult this chapter.
|clearlogs| - Deleting logs
Log files are saved in the “automation.logs” directory of the user running the operation : [Home Directory]/automation.logs.
“automation-cli” never deletes these files automatically. Your intervention is necessary by indicating the number of days to keep :
- delete all files without exception :
automation-cli clearlogs 0 - keep only the 2 days preceding the current date :
automation-cli clearlogs 2
As this part is very sensitive, this command does not include a confirmation switch. For unambiguous automation, use this command:
echo "Y" | automation-cli clearlogs 10|catop| - Catalog of operations
To display a complete catalog of OPSDirectory operations.
Command: OPS="$(pwd)" automation-cli catop
You can filter by operation name with the “-f [Filter]” switch.
Could be displayed as JSON with -json.
|tree| - View operations as a tree
A highly visual way of viewing the contents of OPSDirectory operations : OPS="$(pwd)" automation-cli tree.
This command has several options (OPS="$(pwd)" automation-cli tree --help), including an option to generate the complete command to execute an operation (“-gc” & “-h”). This option generates a complete command including required and optional parameters and the list of target hosts.

|search| - Operations research
This command searches all operations for one or more words in the operation name or comment, to produce a list of matching operations.
|deplist| - Package dependency
The “dependencies” attribute in an operation is the list of Debian packages required to execute an operation. This feature displays a summary of these values by operation (operations located in OPSDirectory).
Options :
automation-cli deplist --help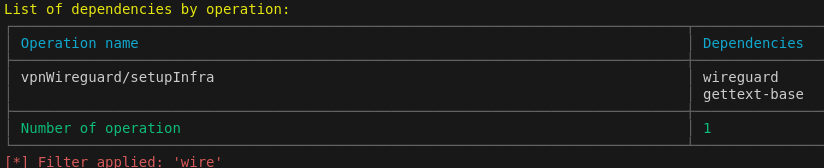
|importop/exportop| - Import/Export an operation
“automation-cli” allows you, as indicated, to import or export an operation.
The file generated is in Zip format.
Command :
- Import operation:
OPS="$(pwd)" automation-cli importop -f [full path zip file] - Export operation:
OPS="$(pwd)" automation-cli exportop -op [operation name]
|listen| - Retrieve information from the network
This command has been implemented in order to easily find a server on the network. It’s a very useful function when you don’t know how to configure the DHCP service on your network. Or when you’re using RaspberryPIs, there’s no MAC address entry on the card, so it’s impossible to configure the DHCP server in advance.
To implement this feature, the server must start the service I’ve named “presence”, which is available in collections of operations.
Once the service has been installed and the server started, from your control node on the same network as the server, run :
automation-cli listenServers are displayed only once.
CTRL+C to exit, for options, add --help.
The “presence” service installed on a server sends a signal (server hostname) every 15 seconds to the network broadcast address.

Dynamic inventory update function
By using the “-i [inventoryFile]” switch, the detached host will be added to the list represented by the “serversGroups” attribute of the inventory.
For example, your inventory file “./inventory.yaml” before the update :
serverGroups - all [...] server: 172.28.1.1
Inventory file status after dynamic update :
serverGroups - all [...] server: 172.28.1.1 infra: 172.28.1.10[serve] Minimalist web server
For practical reasons on a local network, “automation-cli” can distribute files by means of a web service. This service is minimalist, so don’t expect to host a website with it :).
I use it, for example, to expose public ssh keys, shells, iso images and so on. The default values are :
- Listening port: 9200
- Working directory “$OPS/public”.
You can modify these values by passing the switches: -d and/or -p.
The principle is simple: you create the “public” directory in your “OPSDirectory”, add a few files and start the :
OPS="$(pwd)" automation-cli serveOther workstations can connect to the address displayed (CTRL+C to stop).
[audit] Security audit
OPS="$(pwd)" automation-cli audit